Subscribe To Our NewsLetter
Share This Post:
In Drupal, local tabs are an essential feature used to organize and display multiple configuration pages in a user-friendly manner.These tabs group related pages together, providing an intuitive and seamless navigation experience.
By using local tabs, administrators and users can easily access different settings and configurations from a single interface without having to navigate through multiple pages. This functionality enhances the overall user experience, making it easier to manage and configure various aspects of a Drupal site efficiently.
To create the Drupal Local tabs we can follow these steps:
Create A Module
- First Create a module For example “custom_module”
- After that define the custom_module.info.yml File in your custom module directory
Structure:
custom_module/
Custom_module.info.yml
- In this file, you can define your module name, version, and description
name: Custom Module
description: Custom Module
type: module
core_version_requirement: ^8 || ^9 || ^10
Defining Routes for Custom Functionality
Now we have to define the Routing For Your Configuration Page route. To define the Routing.
Create custom_module.routing.yml
custom_module/
custom_module.info.yml
custom_module.routing.yml
Routing Definition for your Custom_module.routing.yml In the Routing file we will define two different Routes.
- Route 1
custom_module.tab_one:
path: '/admin/config/page_1'
defaults:
_form: Drupal\custom_module\Form\ModuleSettings
requirements:
_permission: administrator site configuration
- Route 2
custom_module.tab_two:
path: '/admin/config/page_2'
defaults:
_form: Drupal\custom_module\Form\ModuleSettingsForSecondPage
requirements:
_permission: administrator site configuration
Create Drupal Config Form
Now we have to create forms for this route.
Structure
custom_module/
custom_module.info.yml
custom_module.routing.yml
Form
ModuleSettings.php
<?php
namespace Drupal\custom_module\Form;
use Drupal\Core\Form\FormBase;
use Drupal\Core\Form\FormStateInterface;
class ModuleSettings extends FormBase{

   public function getFormId()
   {
       return 'module_settings';
   }
   public function getEditableConfigNames(){
       return [
'module_settings.settings'
}
   public function buildForm(array $form, FormStateInterface $form_state)
   {
$form['path'] = [
'#type' => 'textfield',
'#title' => 'Path'
;];
$form['submit'] =[
'#type' => 'submit',
'#value' => 'submit'
];
return $form;
}
public function submitForm(array &$form, FormStateInterface $form_state)
{
$this->config('module_settings.settings')->set('path' , $form_state->getValue('path'))->save();
}
}
- After that, we can create another form.
Structure
custom_module/
custom_module.info.yml
custom_module.routing.yml
Form
ModuleSettings.php
ModuleSettingsForSecondPage.php
<?php
namespace Drupal\custom_module\Form;
use Drupal\Core\Form\FormBase;
use Drupal\Core\Form\FormStateInterface;
class ModuleSettingsForSecondPage extends FormBase{
 public function getFormId()
   {

        return 'module_settings_second';
   }
   public function getEditableConfigNames(){
       return [
           'module_settings_second.settings'
       ];
   }  public function buildForm(array $form, FormStateInterface $form_state)
   {
       $form['path'] = [
           '#type' => 'textfield',
           '#title' => 'Path'
       ];   $form['submit'] =[
           '#type' => 'submit',
           '#value' => 'submit'

];
       return $form;
   }
   public function submitForm(array &$form, FormStateInterface $form_state)
   {
       $this->config('module_settings_second.settings')->set('path' , $form_state->getValue('path'))->save();
   }
}
Define Tabs With Title And Description
After defining the forms We created a File With the name custom_module.links.task.yml.
The module folder structure will look like the following:
custom_module/
custom_module.info.yml
custom_module.info.yml
custom_module.links.task.yml
Form/
ModuleSettings.php
ModuleSettingsForSecondPage.php
Here we have to define the tab order, tab path, Tab Description.
custom_module.tab_one:
route_name: custom_module.tab_one
title: Tab one
base_route: custom_module.tab_one

custom_module.tab_two:
route_name: custom_module.tab_two
title: Tab Two
base_route: custom_module.tab_one

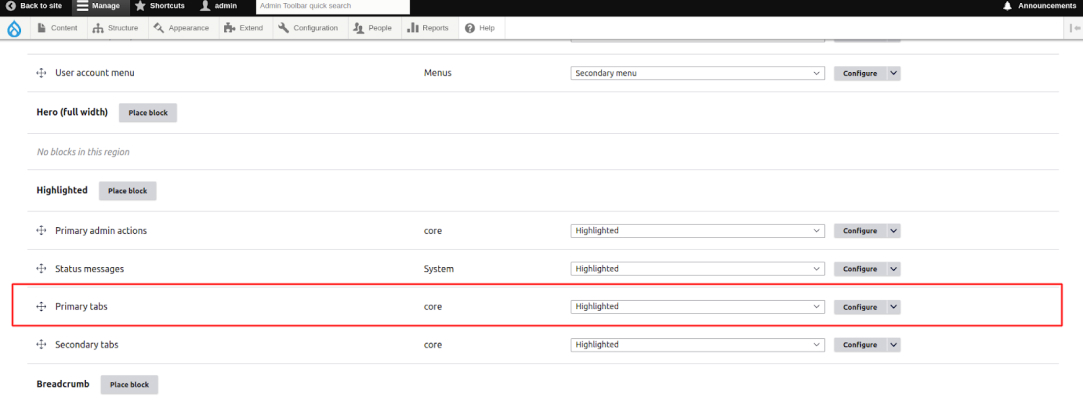
To ensure the primary tabs are effectively displayed, it's important to place the Primary tabs block in the Highlight section of your Drupal site. This strategic placement allows the tabs to be prominently featured, making them easily accessible for users. The Highlight section is typically designed to draw attention to key navigational elements, ensuring that the primary tabs are visible and intuitive to use. >

Let’s Wrap It Up!
Creating local tasks (tabs) through a custom module in Drupal involves defining routes and associating them with specific controllers and menu items. By strategically placing these tabs in the Highlight section, you ensure they are easily accessible to users. This process enhances site navigation, making configuration and management more intuitive. By following these steps, you can tailor the Drupal interface to better meet the needs of your users and administrators.
At LN Webworks, our Drupal experts are always prepared to help you. Contact us today to schedule your free consultation!
Share This Post:
Author Information

LN Webworks
Your Drupal Solution PartnerLN Webworks have championed open-source technologies for nearly a decade, bringing advanced engineering capabilities and agile practices to some of the biggest names across media, entertainment, education, travel, hospitality, telecommunications and other industries.
Talk With Certified Experts Of LN Webworks!
Related Articles
April 8, 2024
How To Create Drupal Custom Entity: Step By Step Guide
April 26, 2024


